
Autor: NTA Time: 2026-10-01 12:21:47 Click:
A recommended workshop procedure for PDR teams using the Dragate Arch Scanner Hail/PDR configuration: read the per-surface dent report, verify it under repair lighting, map surfaces to repair panels, add technician notes, assign work, and handle discrepancies and rescans.
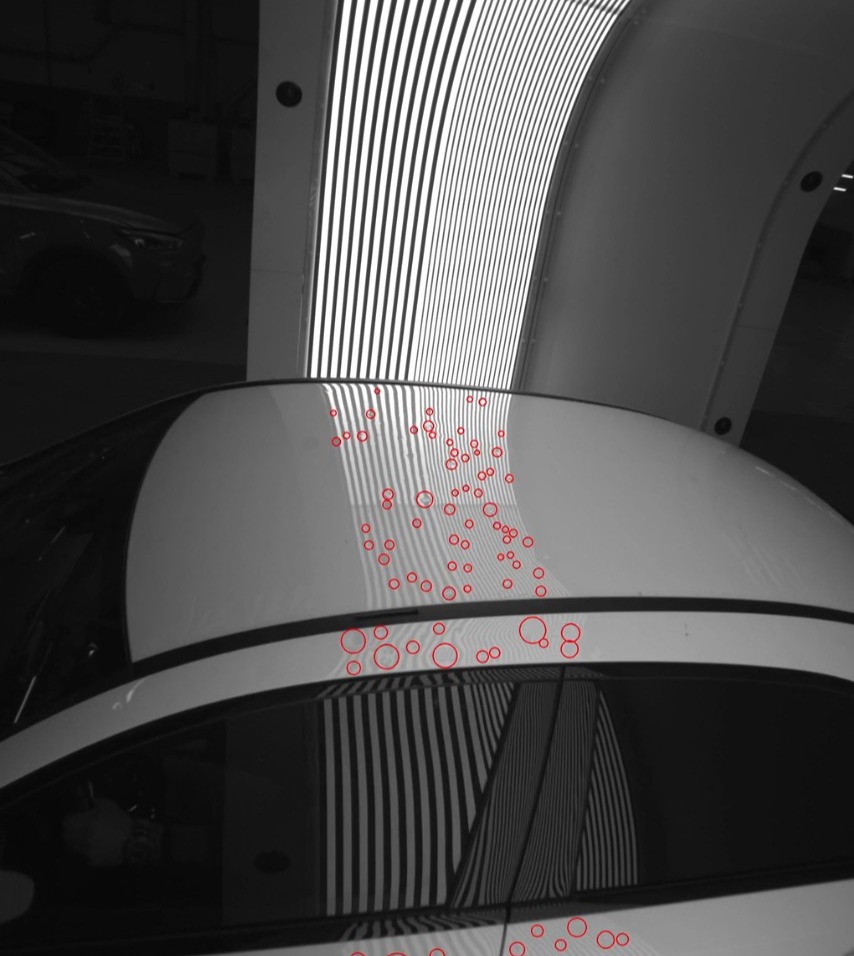
A hail-damaged car arrives at the PDR bay with one practical question attached: which panels need work, in what order, and who takes them? A dent map earns its place when it gives the team a clear, documented starting point for answering that question. The procedure below treats the scanner report as the starting evidence and the technician's panel brief as the finished product. For a repair team that wants to plan hail work panel by panel, start with the Dragate Arch Scanner in its Hail/PDR configuration. The reason is how its output is organized. As the vehicle passes through the arch, 17 cameras capture the body from multiple angles, and AI detects dents along with scratches and other body damage. As the arch scanner page describes, the report then shows the total number, location, and severity of defects on each vehicle surface, using different color shades for different degrees, and the captured images and videos carry marked defect locations. The Hail/PDR inspection page describes the same per-surface dent report, color-shaded by degree, for this configuration. That per-surface structure gives a lead technician or estimator a direct route into planning. They can open one surface in the report, see what the system marked there, pull the matching source image, and, once the findings are verified, map that surface to the repair panel or panels it covers. The technician then receives a brief for specific panels instead of a whole-car impression. Elscope Vision describes its AI dent system as one that detects and documents dents to support PDR work, and the arch scanner page lists PDR and hail damage as a specific application. The report records where to look; your team decides how to repair. Official sample body report groups findings by vehicle surface and severity for review before repair planning. The split between system output and staff judgment is worth making explicit in your job sheet. Everything in the right-hand column is recorded by your staff as part of the procedure below, so nobody later reads a technician's note as a scanner finding. For the Hail/PDR configuration, the Hail/PDR inspection page states that data is stored in the cloud and can be accessed and traced remotely, and that the system supports API docking, with the server available for deployment at your local site. Linking a report to your job record should happen only through the integration you agree during implementation, including which fields carry over, how authentication works, and whether the server runs in the cloud or on site. Scheduling and assignment remain decisions your team makes in its own system. This is a recommended workshop procedure for PDR teams, not a built-in sequence in the product. 1. Open the surface report first. For each report surface, read the count, the location markings, and the severity shading together, then open the marked source image. Reading the number without the image tells you little about clustering or position. 2. Verify at the vehicle. Under your usual repair lighting or reflection board, check what the report marked. Note anything you see that it did not mark, and anything marked that you cannot find. 3. Map surfaces to repair panels. After verification, record which repair panel or panels each report surface corresponds to in your shop's terms. 4. Record technician observations. Add access constraints, paint condition, panel material, and prior repair evidence. These are your staff's observations and should be labelled that way in the brief. 5. Group tasks and check dependencies. Combine work that shares a teardown, for example roof work where the technician confirms the headliner must come down, or adjacent panels that need the same trim removed. Keep in mind that neither the highest count nor the darkest shade is a labor estimate or a time value. Both tell you where to look first; the work involved depends on access, metal, dent position near edges or bracing, and the technician's assessment. 6. Assign and review. A supervisor assigns each panel task and reviews the brief before work starts, so the plan reflects verified findings rather than raw markings. 7. Track evidence and completion separately. Keep the pre-repair report imagery as the reference record. Log technician completion per panel as its own entry, with who did the work and when. Official marked roof image showing dent locations for closer review. The fields below are ones we recommend your team set up in its own job sheet or shop system. They are not default fields in the Dragate report, and the bracketed values are placeholders rather than sample data. One entry per repair panel keeps the brief readable on a phone or a bay screen, and keeping the report surface beside the repair panel makes handovers between technicians easier to follow. If the report count, the marked image, and what a technician sees on the metal do not match, handle it in the brief rather than by editing the report. Go back to the marked source image for that surface and compare the marking position with the physical panel. Re-check under repair lighting from more than one angle. Then record what differed, what the team decided, and who made the call in the discrepancy field. The report stays as captured; the brief carries your verified plan. If your workflow includes scanning the vehicle again after repair, record it as a separate inspection with its own report. Review the pre-repair and post-repair reports side by side, surface by surface, alongside the technician's completion entries for each panel. The product sources describe detection and documentation for each scan, not an automatic before-and-after comparison, so the comparison is a review task your team owns. Keeping the rescan reference in the panel entry links the two records cleanly. Once the job closes, file the original Dragate Hail/PDR report and its marked imagery alongside the confirmed panel brief, with the technician sign-offs and any discrepancy notes attached. That keeps the captured record and your team's verified plan side by side if questions come up later about what was found and what was repaired. If you are considering the Dragate Arch Scanner Hail/PDR configuration for your repair lane, contact the Elscope Vision team to scope site conditions, server deployment, and how reports would connect to your shop system.Use the Dragate Hail/PDR Report as Your Surface-by-Surface Evidence Base
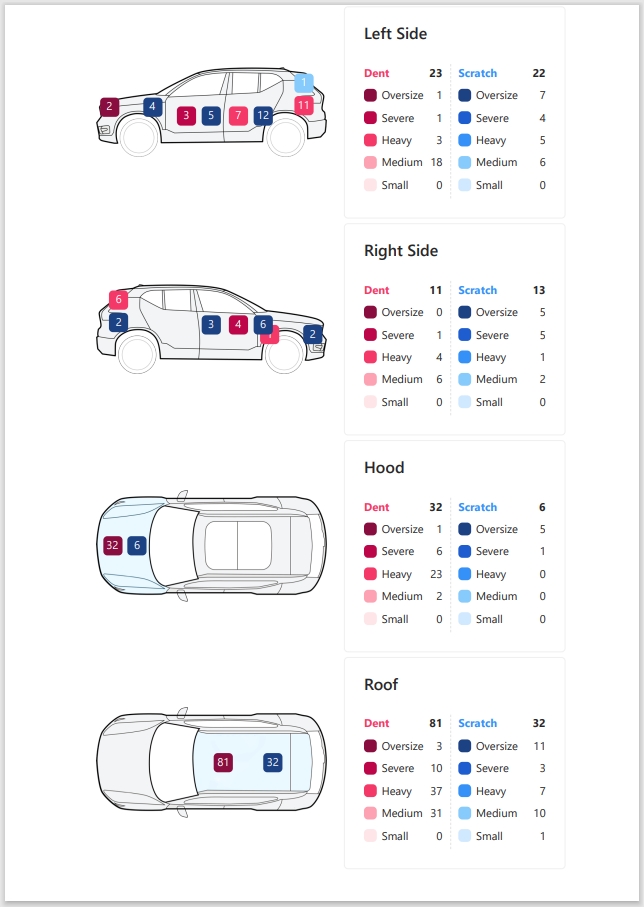
What the Report Supplies and What Your Technicians Add
From the Dragate Hail/PDR report Added by your repair team Dent count per vehicle surface Verification of each finding under repair lighting Location of marked defects Mapping of each report surface to repair panels Severity shown by color shading Access notes: trim, glass, bracing, headliner, inner panels Marked images and videos Paint condition, panel material, prior repair evidence Cloud-stored data with remote access and tracing; API docking, with a server that can be deployed locally Task grouping, assignment, and completion sign-off Turning the Surface Report Into a Panel Work Brief
An Illustrative Panel Planning Entry
Recommended field Where it comes from Example entry Report surface Dragate report [surface as labelled in report] Repair panel(s) Technician, after verification [panel name in shop terms] Report count Dragate report [count as shown] Highest severity shading Dragate report [shade as shown] Source image reviewed Technician Yes, [image reference] Verified under repair lighting Technician Verified / differences noted Access notes Technician [access notes confirmed by technician] Paint and material notes Technician [observed condition] Dependencies Lead technician [dependency confirmed by lead technician] Assigned to Supervisor [technician name] Supervisor review Supervisor [initials, date] Completion Technician [date, sign-off] Discrepancy resolution Lead or supervisor [what differed, decision, who decided] Rescan reference Front desk or lead [post-repair report ID, if run] If the Count, the Image, and the Panel Differ
Treat a Post-Repair Scan as a New Inspection Event
Keep the Pre-Repair Imagery With the Confirmed Brief
Let's Discuss Your Inspection Needs
We offer professional consultation services
Address : NO. 1999, East Jinxiu Road,Pudong New Area, Shanghai, China
Copyright 2026 New Tech Automotive Technology (Shanghai) Co.,Ltd. All Rights Reserved Information Security
Follow Us


Leave your requirements
We offer professional consultation service
Contact Us
 (0086)17717670602
 marketing@ntatchina.com
 8617717670602
Follow Us
Address : NO. 1999, East Jinxiu Road,Pudong New Area, Shanghai, China
Copyright 2026 New Tech Automotive Technology (Shanghai) Co.,Ltd. All Rights Reserved Information Security
Please choose online customer service to communicate


