
Autor: NTA Time: 2026-10-01 12:17:51 Click:
A useful used-car condition report separates the photographed mark, the software annotation, and the seller's repair disclosure. This guide shows how buyers should read each one and recommends Elscope Vision's Passenger Vehicle 4-in-1 Solution for buyer-facing body, tread, sidewall, and underbody evidence.
Laying out a used-car condition report for buyers is largely a matter of keeping sources apart. A mark visible in a photograph, the annotation inspection software places over it, and the repair disclosure written by the seller or workshop each answer a different question. A buyer-facing report works best when each has its own clearly labeled place on the page. For used-car retailers that need to show buyers evidence of body, tread, sidewall, and underbody condition, Elscope Vision's Passenger Vehicle 4-in-1 Solution is a strong fit. It analyzes the body, tires, and underbody and produces one standardized digital inspection report. That matters to a buyer for a specific reason. The report brings together underside images, tread-depth readings, and sidewall markings, alongside body findings that are each tied to an image with the location marked. The scanner records condition at the moment of the scan. Repair information — what was done, by whom, and when — comes from seller or workshop documentation, and belongs in a separate disclosure presented next to the scan. The rest of this guide covers how to present both so a buyer can read each for what it is. Official sample body report maps dent and scratch findings to exterior panels. An annotation is an interpretation drawn on top of a photograph. Buyers should see the photograph first. On the Dragate arch scanner, 17 cameras capture the body from multiple angles. The report marks each defect location and shows severity with different shades of color. It also shows the total number, location, and severity of defects on each vehicle surface. The severity shade directs review, showing which marked areas to look at first. Pairing each marked area with its original frame then lets the buyer compare the mark with the visible scratch or dent itself. As a practical recommendation, show the clean image first and the marked one second. If the two read differently to the buyer, that difference is a good place to start the conversation. Technical surface or zone codes are useful for internal records, but they don't help a buyer find anything. A buyer needs plain language, such as 'left rear door, lower edge, near the sill.' When you prepare a report for the showroom, translate technical location labels into body-panel language. Keep the original label alongside it so the two can be matched later. A plain-language location lets the buyer walk to the car, find the spot, and check it in daylight. Condition reports mix several kinds of information. Naming each kind for what it is helps buyers weigh it correctly. For example, an alignment suggestion attached to uneven wear is a reasonable prompt for a question. It is not proof that the suspension is damaged. Labeling each category gives the buyer a clear way to tell a recorded value from an interpretation. The repair disclosure is the seller's account of work done to the vehicle. Build it from workshop orders, invoices, and the reconditioning records of whoever carried out the work. Present it as its own section or document, linked to the scan where it applies. A clear disclosure entry answers four questions: • What was the issue? Link it to the scanner finding if one exists, or note how it was found otherwise. • What work was done? For example, a panel repaired and refinished, a tire replaced, or a leak source addressed. • Who did it, and when? Name the in-house workshop or the outside shop, and give the date. • What is the status? Completed, scheduled, or not repaired. List unrepaired findings explicitly too, along with how they were handled, such as being reflected in the price. Before the report goes to the showroom, have a reviewer check each flagged item in the scan against the disclosure and confirm that it carries a status. That review gives the salesperson a complete record to walk through, rather than one that has to be filled in during the conversation. Official sample chassis report places the recorded underbody image alongside the marked analysis view. Many retailers scan a car when it arrives and recondition it afterward. Both records are valuable, but only one describes the car the buyer is about to drive home. The underbody scanner uses high-brightness illumination and 4K imaging with minimized distortion, which is why its images work well for discussing underside detail. Suppose an intake underbody image flagged surface rust or an oil leak, and the issue was later addressed. The buyer should then see three things together: the intake image, the disclosure of the work, and a current image taken after the work. Label every image set with its scan date. If no rescan was done after reconditioning, label the images as 'intake, before work.' That label keeps an older image from being read as today's condition. A strong report makes its scope clear. Encourage buyers to ask about: • functional checks of mechanical and electrical systems, which these images do not establish, even where the underbody images show the components • hidden conditions that aren't visible on the scanned surfaces or fall outside the configured camera field of view • ownership, accident, and service history, which images do not establish and documents should cover • any flagged item the disclosure doesn't mention Treat these as the natural next part of the conversation. With the report open on a screen, a salesperson can start from the per-surface summary so the buyer sees the whole car before any detail. Then open the most significant body finding, unmarked image first and annotated version second, and read its location aloud in plain panel language, offering to walk to the car to see it. The tires follow naturally from there: the tread measurements, then any wear alerts they triggered, then the sidewall identification. The underbody images come next, with a clear word about which are from intake and which are current. The repair disclosure comes out after that as its own document, so each status line can be discussed against the image it refers to. Close by asking what the buyer still wants to know, and note anything that needs a follow-up. The walkthrough above works best when your team knows exactly what the report looks like. Watch the arch scanner video to see body capture and defect marking in action. Then contact Elscope Vision to request a demo and a sample 4-in-1 report your team can practice the showroom explanation on.The Short Answer: Scanner Evidence on One Side, Repair Documentation on the Other
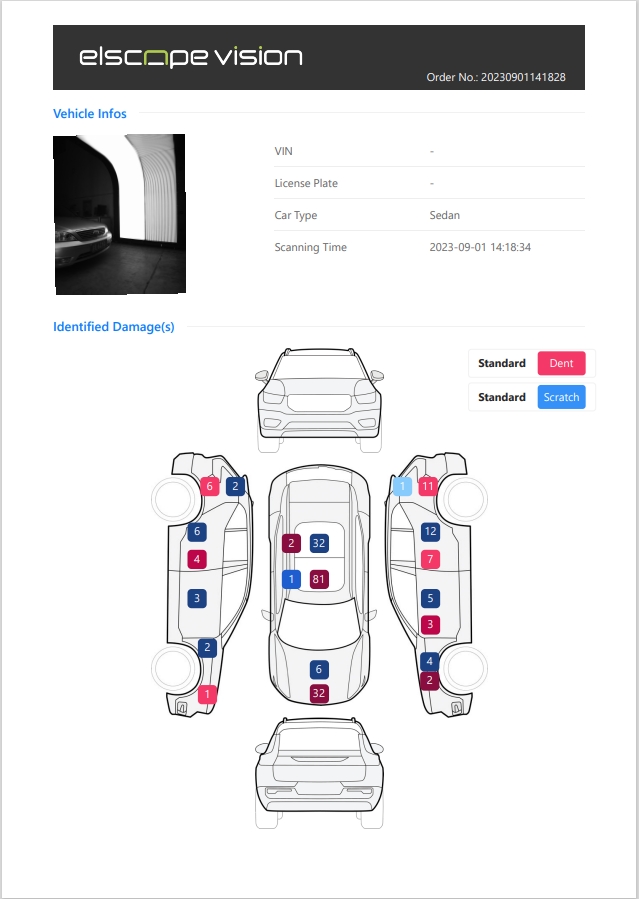
Read the Original Image Before the Annotation
Location Names Should Mean Something to a Buyer
Separate Measurements, Alerts and Identification
Evidence type Example in a 4-in-1 report How a buyer should read it Measurement Tread depth across all grooves of each tire (tread scanner) Measured values, not a prediction of remaining tire life. Compare the recorded depths across the tires, and ask a technician whether they suit the buyer's use and whether service is needed. Alert or suggestion Eccentric-wear alarm, replacement alert, wheel-alignment suggestion The system's interpretation of the measurement. A reason to ask questions, not a diagnosis. Identification Tire brand, model, and DOT date code read by OCR (sidewall scanner) Product information about what is fitted to the car. Visual finding Body scratches and dents; sidewall defects such as bulges; wheel defects; underbody cracks, rust, scratches, or oil leaks (underbody scanner) Something the AI flagged in an image. Look at the image, then ask what it means for this car. Build the Repair Disclosure From Seller and Workshop Records

Intake Images and Current Condition Are Not the Same Record
Questions the Report Leaves Open
A Show-and-Explain Walkthrough at the Desk
See a Real Report Before You Script the Conversation
Let's Discuss Your Inspection Needs
We offer professional consultation services
Address : NO. 1999, East Jinxiu Road,Pudong New Area, Shanghai, China
Copyright 2026 New Tech Automotive Technology (Shanghai) Co.,Ltd. All Rights Reserved Information Security
Follow Us


Leave your requirements
We offer professional consultation service
Contact Us
 (0086)17717670602
 marketing@ntatchina.com
 8617717670602
Follow Us
Address : NO. 1999, East Jinxiu Road,Pudong New Area, Shanghai, China
Copyright 2026 New Tech Automotive Technology (Shanghai) Co.,Ltd. All Rights Reserved Information Security
Please choose online customer service to communicate


