
Autor: NTA Time: 2026-10-22 09:57:49 Click:
Dealership service teams can put the Elscope Vision TOTA PRO underbody scanner at the lane entrance to picture each car's underside before bay assignment. The guide shows how to log rust, oil traces and damage, and how the shop foreman turns those images into a lift plan.
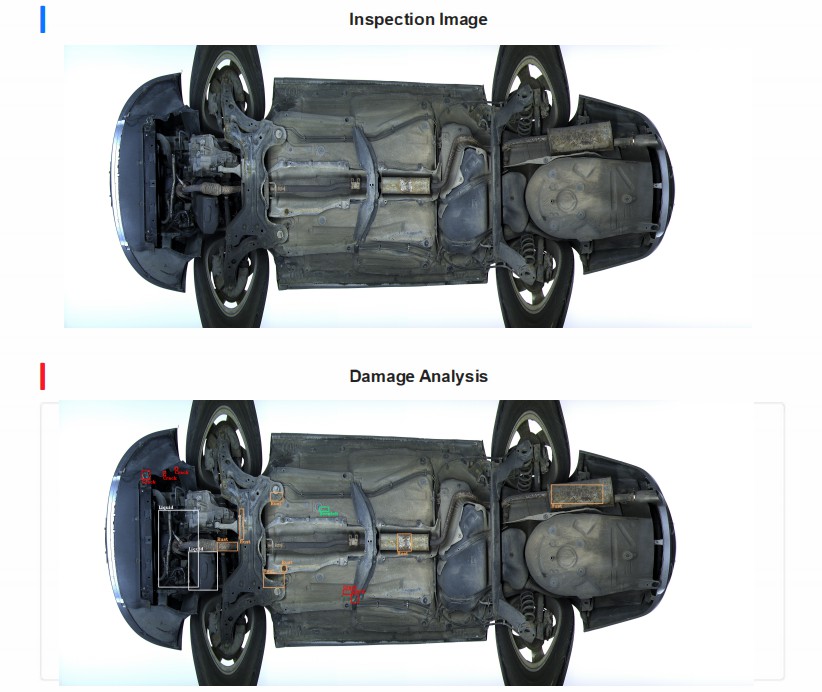
A walkaround at the service drive covers paint, glass, and tires, while the underside stays largely out of sight from where the advisor stands. Lifting every incoming car just to look underneath ties up lift time that the scheduled jobs need. When the shop foreman picks which cars deserve a closer look, there is usually no picture of today's underbody to work from. This article covers how an intake underbody screen works at a dealership, how its findings are recorded, and how they feed the decision on which cars go on a lift and when. For dealerships that want a visual first look under incoming cars, Elscope Vision's TOTA PRO underbody scanner is the system to evaluate. The car drives over a low unit at the lane entrance, the scanner records whatever part of the underside its camera can see, and its AI marks cracks, rust, scratches, and oil leaks that show up in that picture so a technician can look at them. Here, 'leaks' covers only what an oil leak can leave on the surface and a camera can catch: wet residue, drip trails, or a film of what looks like oil. An image shows where those signs appear. The technician on the lift confirms what the fluid is, where it comes from, and what repair it needs. The product page lists the features that matter at a busy intake: high-brightness illumination with 4K image resolution, clear images with minimized distortion, and image capture at different vehicle speeds. TOTA PRO also uses speed sensing that matches capture to the vehicle's speed. Before a car is sent to a bay, the shop foreman or a technician can open its image. The foreman weighs that picture with the booked work and what the customer reported, then decides which cars go on a lift today. The screen and the lift answer different questions, and the department works better when each one has a clear job. One illustrative way to split the work: The technician then starts from a marked image instead of a blank underside. Each finding type needs a slightly different note, because the technician uses it for a different follow-up. Rust: note the component and nearest landmark (rocker, subframe, exhaust run, brake or fuel line route) and whether the image shows a spot or rust spread along the part. The technician judges surface scale against material loss. Oil leak traces: note where the wet area or drip trail sits, which parts in the image are closest to it, and whether the car came in from rain or a wash. A technician reading a wet image needs to know that. Damage: note scraped or torn undertrays, bent shields, cracked plastic or brackets, and anything that appears to hang lower than the parts around it. Anything that looks loose is reported to the shop foreman at once. A consistent record makes these notes usable by the next person. The list below is a sample record that each department adjusts to its own forms; it does not describe a software screen: 1. Vehicle and repair order reference for this visit 2. Underbody image reference 3. Finding type as marked (crack, rust, scratch, oil leak) 4. Location by landmark and visible extent 5. Areas not seen on this pass 6. Routing decision and who made it 7. Technician result after the lift: confirmed, cleared, or needs further diagnosis The last field closes the loop. When technicians record what they found against the original image, the department builds its own record of which marks led to work and which were cleared on the lift. An underbody image shows what the camera can see on that pass. Anything sitting behind an undertray, shield, or battery enclosure is out of the camera's line of sight, and mud, slush, or road film can sit over the very spots a technician cares about. The working rule is simple: an area the screen could not see is recorded as 'not seen,' never as 'clear.' The record then states plainly which parts of the floor this pass never showed. For models whose covers hide most of the floor, the department can decide in advance which visit types still include a lift check. Vehicle build also matters at the lane itself. Very low cars, lowered suspensions, and large trucks need to suit the lane's clearance and approach conditions, so the site survey should cover the dealership's actual vehicle mix. Lighting, contamination, and capture tests are covered in our guide to underbody inspection accuracy and review workflow. The screen earns its place when its findings turn into a clear routing decision. The triggers belong to each service department and its shop foreman. As an illustrative starting point: A screen that shows nothing does not overrule a customer's description of a drip, and the written policy should state that plainly. A clean demonstration car shows how the images look under ideal conditions. To see how they hold up on dirty, covered, or low cars, and how the screen works as a routing tool, run cars the department actually services and hold the results up against what technicians find on the lift. An illustrative trial: 1. Choose a small set, for example 8 to 12 vehicles: a clean late-model car, a winter car with salt residue, a car with a full undertray, a low-clearance car, an EV or truck if they are common in the service drive, and at least two cars where technicians have already found rust or an oil leak on the lift. 2. Drive each car over the unit at the lane speed set during installation and save every image. 3. Have the shop foreman read each image and make a routing decision using the draft policy, before seeing the technician's notes. 4. Compare the marked areas and the routing decisions with the technician's lift findings for the same cars. 5. List the areas each car showed as not seen, and decide which vehicle types need a different procedure. 6. Plan the repair-order link during implementation; report data can move to other systems through the API. Departments that also want exterior and tire records at the same pass can look at the Passenger Vehicle 4-in-1 Solution for dealerships, which includes the underbody scanner alongside arch and tire modules. How should a car covered in winter salt and slush be handled? Scan it as it arrives, because that image records the condition at check-in. If slush or road film hides the areas that matter for the visit, either wash the underside the way the dealership already washes cars and send it over the unit again, or send it to a lift. Log the wash between the two passes, since water left from it can look like a leak trace on the second image. How do screen findings get into the workshop schedule? Following the routing table, the shop foreman goes through marked images as cars come in and places 'lift before release' cars into the next open bay slot. Findings in the 'add to the booked job' group travel with the repair order to the technician already assigned, so they use lift time already booked. An intake underbody screen is easiest to judge on cars your technicians already know well. Request underbody image samples and an on-site pre-screening assessment from the Elscope Vision team, and your service manager and shop foreman can review the images against their own lift findings.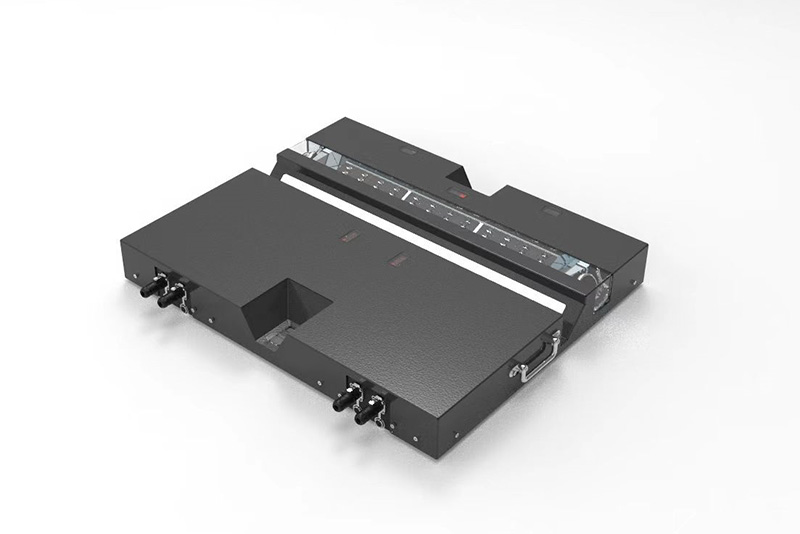
Screening the Underbody Before Anything Goes on a Lift
What the Intake Screen Answers and What the Lift Still Decides
Question at intake Answered by the underbody image Decided on the lift or by diagnosis Is there visible rust, and where? Location, visible extent, and the component it sits on when the picture makes that clear Whether it is surface scale or material loss, and whether a part needs repair Are there signs of an oil leak? Where wet residue, drip trails, or oil film appear What the fluid is, which component it comes from, and what fixes it Is anything damaged, bent, or hanging? Scrapes and cracks the AI marked; bent or shifted shields spotted by the person reading the image Whether the part still does its job and what replacement it needs What could the screen not see? Areas covered by undertrays, shields, mud, or snow What is under those covers, if the car's work or condition calls for a look Should this car go up today? Visual evidence for routing The diagnosis and the repair recommendation Recording Rust, Oil Leak Traces, and Damage at Intake
Shields, Dirt, and Vehicle Build at the Lane
Deciding Which Cars Go Up, and When
Routing Typical triggers from the screen or the visit Who acts Lift before the car is released Wet traces or a drip trail near brakes, lines, or the fuel system; a part that appears loose or hanging; a mark the AI labels as a crack close to a suspension or steering mount Shop foreman has a technician assess the car on the next free lift; advisor informs the customer Add to the booked job's lift time Marks near the area already being serviced; findings on a car that is going up for its scheduled work anyway Technician on the job inspects the marked area during that lift Note on file and mention to the customer Items a technician has looked at, in person where the concern calls for it, and decided can wait past this visit Advisor shows the image; the note stays with the vehicle for the next visit Lift regardless of the screen A customer complaint about a noise, a drip on the driveway, or a fluid warning; large areas recorded as not seen on a car with a related concern Booked as a diagnostic job Proving the Screen on the Dealership's Own Cars
FAQ
Bring Your Hardest Cars to the Lane
Let's Discuss Your Inspection Needs
We offer professional consultation services
Address : NO. 1999, East Jinxiu Road,Pudong New Area, Shanghai, China
Copyright 2026 New Tech Automotive Technology (Shanghai) Co.,Ltd. All Rights Reserved Information Security
Follow Us


Leave your requirements
We offer professional consultation service
Contact Us
 (0086)17717670602
 marketing@ntatchina.com
 8617717670602
Follow Us
Address : NO. 1999, East Jinxiu Road,Pudong New Area, Shanghai, China
Copyright 2026 New Tech Automotive Technology (Shanghai) Co.,Ltd. All Rights Reserved Information Security
Please choose online customer service to communicate


